 Spring MVC 入门
# 1. Spring 与 Web 环境集成
# 1.1 ApplicationContext 应用上下文获取方式
应用上下文对象是通过 new ClasspathXmlApplicationContext(spring配置文件) 方式获取的,但是每次从 容器中获得Bean时都要编写 new ClasspathXmlApplicationContext(spring配置文件) ,这样的弊端是配置 文件加载多次,应用上下文对象创建多次。 在Web项目中,可以使用 ServletContextListener 监听Web应用的启动,我们可以在Web应用启动时,就加载Spring的配置文件,创建应用上下文对象ApplicationContext,在将其存储到最大的域servletContext域中,这样就可以在任意位置从域中获得应用上下文ApplicationContext对象了。
上面的分析不用手动实现,Spring 提供了一个监听器 ContextLoaderListener 就是对上述功能的封装,该监听器内部加载Spring配置文件,创建应用上下文对象,并存储到ServletContext域中,提供了一个客户端工具 WebApplicationContextUtils 供使用者获得应用上下文对象。 所以我们需要做的只有两件事:
- 在 web.xml 中配置 ContextLoaderListener 监听器(导入spring-web坐标)
- 使用WebApplicationContextUtils 获得应用上下文对象 ApplicationContext
# 1.2 导入 Spring 集成 web 的坐标
<dependency>
	<groupId>org.springframework</groupId>
	<artifactId>spring-web</artifactId>
	<version>5.0.5.RELEASE</version>
</dependency>
2
3
4
5
# 1.3 配置 ContextLoaderListener 监听器
<!--全局参数-->
<context-param>
	<param-name>contextConfigLocation</param-name>
	<param-value>classpath:applicationContext.xml</param-value>
</context-param>
<!--Spring的监听器-->
<listener>
	<listener-class>
		org.springframework.web.context.ContextLoaderListener
	</listener-class>
</listener>
2
3
4
5
6
7
8
9
10
11
# 1.4 用 WebApplicationContextUtils 获得应用上下文对象
ApplicationContext applicationContext = WebApplicationContextUtils.getWebApplicationContext(servletContext);
Object obj = applicationContext.getBean("id");
2
# 2. Spring MVC 简介
# 2.1 Spring MVC 概述
Spring MVC 是一种基于 Java 的实现 MVC 设计模型的请求驱动类型的轻量级 Web 框架,属于 SpringFrameWork 的后续产品,已经融合在 Spring Web Flow 中。 SpringMVC 已经成为目前最主流的MVC框架之一,并且随着Spring3.0 的发布,全面超越 Struts2,成为最优秀的 MVC 框架。它通过一套注解,让一个简单的 Java 类成为处理请求的控制器,而无须实现任何接口。同时它还支持 RESTful 编程风格的请求。
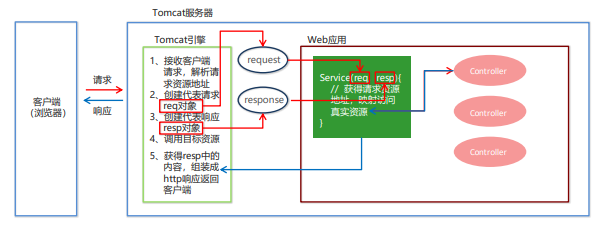
Spring MVC 流程图示:

# 2.2 Spring MVC 快速入门
需求:客户端发起请求,服务器端接收请求,执行逻辑并进行视图跳转。
开发步骤:
- 导入SpringMVC相关坐标
- 配置SpringMVC核心控制器DispathcerServlet
- 创建Controller类和视图页面
- 使用注解配置Controller类中业务方法的映射地址
- 配置SpringMVC核心文件 spring-mvc.xml
- 客户端发起请求测试
# ① 导入Spring和SpringMVC的坐标
<!--Spring坐标-->
<dependency>
	<groupId>org.springframework</groupId>
	<artifactId>spring-context</artifactId>
	<version>5.0.5.RELEASE</version>
</dependency>
<!--SpringMVC坐标-->
<dependency>
	<groupId>org.springframework</groupId>
	<artifactId>spring-webmvc</artifactId>
	<version>5.0.5.RELEASE</version>
</dependency>
<!--Servlet坐标-->
<dependency>
	<groupId>javax.servlet</groupId>
	<artifactId>servlet-api</artifactId>
	<version>2.5</version>
</dependency>
<!--Jsp坐标-->
<dependency>
	<groupId>javax.servlet.jsp</groupId>
	<artifactId>jsp-api</artifactId>
	<version>2.0</version>
</dependency>
2
3
4
5
6
7
8
9
10
11
12
13
14
15
16
17
18
19
20
21
22
23
24
# ② 在 web.xml 配置 SpringMVC 的核心控制器
<servlet>
	<servlet-name>DispatcherServlet</servlet-name>
	<servlet-class>org.springframework.web.servlet.DispatcherServlet</servlet-class>
	<init-param>
		<param-name>contextConfigLocation</param-name>
		<param-value>classpath:spring-mvc.xml</param-value>
	</init-param>
	<load-on-startup>1</load-on-startup>
</servlet>
<servlet-mapping>
	<servlet-name>DispatcherServlet</servlet-name>
	<url-pattern>/</url-pattern>
</servlet-mapping>
2
3
4
5
6
7
8
9
10
11
12
13
# ③ 创建Controller和业务方法
public class QuickController {
	public String quickMethod() {
		System.out.println("quickMethod running.....");
		return "index";
	}
}
2
3
4
5
6
# ③ 创建视图页面index.jsp
<html>
<body>
	<h2>Hello SpringMVC!</h2>
</body>
</html>
2
3
4
5
# ④ 配置注解
@Controller
public class QuickController {
	@RequestMapping("/quick")
	public String quickMethod() {
		System.out.println("quickMethod running.....");
	return "index";
	}
}
2
3
4
5
6
7
8
# ⑤ 创建spring-mvc.xml
<beans xmlns="http://www.springframework.org/schema/beans"
	xmlns:mvc="http://www.springframework.org/schema/mvc"
	xmlns:context="http://www.springframework.org/schema/context"
	xmlns:xsi="http://www.w3.org/2001/XMLSchema-instance"
	xsi:schemaLocation="http://www.springframework.org/schema/beans
	http://www.springframework.org/schema/beans/spring-beans.xsd
	http://www.springframework.org/schema/mvc
	http://www.springframework.org/schema/mvc/spring-mvc.xsd
	http://www.springframework.org/schema/context
	http://www.springframework.org/schema/context/spring-context.xsd">
	<!--配置注解扫描-->
	<context:component-scan base-package="com.itheima"/>
</beans>
2
3
4
5
6
7
8
9
10
11
12
13
# ⑥ 访问测试地址
# 3. SpringMVC 组件解析
占坑,,暂时用不到 Spring MVC
