 应用一:粘包与半包问题
# 1. 粘包与半包的现象复现
# 1.1 服务器代码
public class StudyServer {
    static final Logger log = LoggerFactory.getLogger(StudyServer.class);
    void start() {
        NioEventLoopGroup boss = new NioEventLoopGroup(1);
        NioEventLoopGroup worker = new NioEventLoopGroup();
        try {
            ServerBootstrap serverBootstrap = new ServerBootstrap();
            serverBootstrap.channel(NioServerSocketChannel.class);
            serverBootstrap.group(boss, worker);
            serverBootstrap.childHandler(new ChannelInitializer<SocketChannel>() {
                @Override
                protected void initChannel(SocketChannel ch) {
                    ch.pipeline().addLast(new LoggingHandler(LogLevel.DEBUG));
                    ch.pipeline().addLast(new ChannelInboundHandlerAdapter() {
                        @Override
                        public void channelActive(ChannelHandlerContext ctx) throws Exception {
                            // 连接建立时会执行该方法
                            log.debug("connected {}", ctx.channel());
                            super.channelActive(ctx);
                        }

                        @Override
                        public void channelInactive(ChannelHandlerContext ctx) throws Exception {
                            // 连接断开时会执行该方法
                            log.debug("disconnect {}", ctx.channel());
                            super.channelInactive(ctx);
                        }
                    });
                }
            });
            ChannelFuture channelFuture = serverBootstrap.bind(8080);
            log.debug("{} binding...", channelFuture.channel());
            channelFuture.sync();
            log.debug("{} bound...", channelFuture.channel());
            // 关闭channel
            channelFuture.channel().closeFuture().sync();
        } catch (InterruptedException e) {
            log.error("server error", e);
        } finally {
            boss.shutdownGracefully();
            worker.shutdownGracefully();
            log.debug("stopped");
        }
    }

    public static void main(String[] args) {
        new StudyServer().start();
    }
}
2
3
4
5
6
7
8
9
10
11
12
13
14
15
16
17
18
19
20
21
22
23
24
25
26
27
28
29
30
31
32
33
34
35
36
37
38
39
40
41
42
43
44
45
46
47
48
49
- 第 13 行添加了一个 LoggingHandler,它可以打印出这个 server 收到的消息
# 1.2 粘包现象
client 端代码如下:
public class StudyClient {
    static final Logger log = LoggerFactory.getLogger(StudyClient.class);
    public static void main(String[] args) {
        NioEventLoopGroup worker = new NioEventLoopGroup();
        try {
            Bootstrap bootstrap = new Bootstrap();
            bootstrap.channel(NioSocketChannel.class);
            bootstrap.group(worker);
            bootstrap.handler(new ChannelInitializer<SocketChannel>() {
                @Override
                protected void initChannel(SocketChannel ch) throws Exception {
                    log.debug("connected...");
                    ch.pipeline().addLast(new ChannelInboundHandlerAdapter() {
                        @Override
                        public void channelActive(ChannelHandlerContext ctx) throws Exception {
                            log.debug("sending...");
                            // 每次发送16个字节的数据,共发送10次
                            for (int i = 0; i < 10; i++) {
                                ByteBuf buffer = ctx.alloc().buffer();
                                buffer.writeBytes(new byte[]{0, 1, 2, 3, 4, 5, 6, 7, 8, 9, 10, 11, 12, 13, 14, 15});
                                ctx.writeAndFlush(buffer);
                            }
                        }
                    });
                }
            });
            ChannelFuture channelFuture = bootstrap.connect("127.0.0.1", 8080).sync();
            channelFuture.channel().closeFuture().sync();

        } catch (InterruptedException e) {
            log.error("client error", e);
        } finally {
            worker.shutdownGracefully();
        }
    }
}
2
3
4
5
6
7
8
9
10
11
12
13
14
15
16
17
18
19
20
21
22
23
24
25
26
27
28
29
30
31
32
33
34
35
36
服务器接收结果:
[nioEventLoopGroup-3-1] DEBUG io.netty.handler.logging.LoggingHandler - [id: 0x5b43ecb0, L:/127.0.0.1:8080 - R:/127.0.0.1:53797] READ: 160B
根据日志可以看到,虽然 client 发了 10 次 16B 的数据,但 server 却只接收了一次,接收的数据大小为 160B,即客户端发送的数据总大小,这就是粘包现象。
# 1.3 半包现象
为方便复现,将 client-server 之间的 channel 容量进行调整
server 端代码:
// 调整channel的容量
serverBootstrap.option(ChannelOption.SO_RCVBUF, 10);
2
注:
serverBootstrap.option(ChannelOption.SO_RCVBUF, 10)影响的底层接收缓冲区(即滑动窗口)大小,仅决定了 netty 读取的最小单位,netty 实际每次读取的一般是它的整数倍
服务器接收的打印结果:
[nioEventLoopGroup-3-1] DEBUG io.netty.handler.logging.LoggingHandler  - [id: 0xc73284f3, L:/127.0.0.1:8080 - R:/127.0.0.1:49679] READ: 36B

[nioEventLoopGroup-3-1] DEBUG io.netty.handler.logging.LoggingHandler  - [id: 0xc73284f3, L:/127.0.0.1:8080 - R:/127.0.0.1:49679] READ: 40B

[nioEventLoopGroup-3-1] DEBUG io.netty.handler.logging.LoggingHandler  - [id: 0xc73284f3, L:/127.0.0.1:8080 - R:/127.0.0.1:49679] READ: 40B

[nioEventLoopGroup-3-1] DEBUG io.netty.handler.logging.LoggingHandler  - [id: 0xc73284f3, L:/127.0.0.1:8080 - R:/127.0.0.1:49679] READ: 40B

[nioEventLoopGroup-3-1] DEBUG io.netty.handler.logging.LoggingHandler  - [id: 0xc73284f3, L:/127.0.0.1:8080 - R:/127.0.0.1:49679] READ: 4B
2
3
4
5
6
7
8
9
可见客户端每次发送的数据,因 channel 容量不足,无法将发送的数据一次性接收,便产生了半包现象。
其实只要我们用 TCP socket 来编程,就会出现粘包和半包问题。
# 2. 现象分析
# 2.1 TCP 的滑动窗口
在 TCP 协议中,client 给 server 发送一个消息后,不是必须等待回复才能继续发送,而是在一个滑动窗口内,client 可以不必等待回复就继续发送消息,如下图所示:
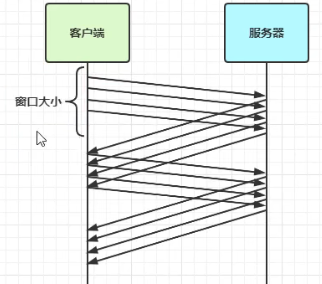
每当 client 收到 server 的消息后,滑动窗口就会向前滑动。
TCP 的发送方和接收方都有维护各自的滑动窗口。
接收方维护一个滑动窗口,只有落在窗口内的数据才能允许接收。
滑动窗口的大小决定了无需等待应答而可以继续发送的数据最大值。窗口实际上就起到了一个缓冲区的作用,同时也能起到流量控制的作用。
# 2.2 粘包的现象分析
现象:发送 abc def,接收到 abcdef
原因:
- 应用层:接收方 ByteBuf 设置太大(Netty 默认 1024)
- 传输层-网络层
- 滑动窗口:假设发送方 256 bytes 表示一个完整报文,但由于接收方处理不及时且窗口大小足够大(大于256 bytes),这 256 bytes 字节就会缓冲在接收方的滑动窗口中,当滑动窗口中缓冲了多个报文就会粘包
- Nagle 算法:(Nagle 算法就是发送方等攒够一定量的数据才发送)会造成粘包
# 2.3 半包的现象分析
现象:发送 abcdef,接收到 abc def
原因:
- 应用层:接收方 ByteBuf 小于实际发送数据量
- 传输层-网络层
- 滑动窗口:假设接收方的窗口只剩了 128 bytes,发送方的报文大小是 256 bytes,这时接收方窗口中无法容纳发送方的全部报文,发送方只能先发送前 128 bytes,等待 ack 后才能发送剩余部分,这就造成了半包
- 数据链路层的 MSS 限制:当发送的数据超过 MSS 限制后,会将数据切分发送,就会造成半包
链路层有一个 MSS 限制,网卡对数据包的大小是有限制的,比如笔记本网卡对数据包的限制往往是 1500B(也称为 MTU),除去 TCP/IP 的报文头 40B,一次只能串 1496B 的数据,一旦超过这个数据,就会将数据切分发送,进而造成半包。
在本地测试由于会走回环地址,它对 MSS 没有限制,因此不会由于这个原因产生半包问题。
# 2.4 本质
发生粘包与半包现象的本质是因为 TCP 是流式协议,消息无边界
# 3. 解决方案
# 3.1 方案一:短连接
客户端每次向服务器发送数据以后,就与服务器断开连接,此时的消息边界为连接建立到连接断开。这时便无需使用滑动窗口等技术来缓冲数据,则不会发生粘包现象。但如果一次性数据发送过多,接收方无法一次性容纳所有数据,还是会发生半包现象,所以短链接无法解决半包现象。
client 代码的改进:
- 修改 channelActive 方法,当连接建立后只发送一次 16B 的数据,而不是像之前那样发送 10 次:
public void channelActive(ChannelHandlerContext ctx) throws Exception {
    log.debug("sending...");
    ByteBuf buffer = ctx.alloc().buffer(16);
    buffer.writeBytes(new byte[]{0, 1, 2, 3, 4, 5, 6, 7, 8, 9, 10, 11, 12, 13, 14, 15});
    ctx.writeAndFlush(buffer);
    // 使用短链接,每次发送完毕后就断开连接
    ctx.channel().close();
}
2
3
4
5
6
7
8
- 将每一次连接建立到连接断开的过程整体封装为
send()方法,通过调用十次send()来模拟发送十次数据:
public static void main(String[] args) {
    // 发送10次
    for (int i = 0; i < 10; i++) {
        send();
    }
}
2
3
4
5
6
修改后运行代码,可以看到不会再发生粘包现象。
# 3.2 方案二:定长解码器
客户端于服务器约定一个最大长度,保证客户端每次发送的数据长度都不会大于该长度。若发送数据长度不足则需要补齐至该长度。
服务器接收数据时,将接收到的数据按照约定的最大长度进行拆分,即使发送过程中产生了粘包,也可以通过定长解码器将数据正确地进行拆分。服务端需要用到 FixedLengthFrameDecoder 对数据进行定长解码,具体使用方法如下:
ch.pipeline().addLast(new FixedLengthFrameDecoder(16));
客户段代码发送数据的代码如下:
// 约定最大长度为16
final int maxLength = 16;
// 被发送的数据
char c = 'a';
// 向服务器发送10个报文
for (int i = 0; i < 10; i++) {
    ByteBuf buffer = ctx.alloc().buffer(maxLength);
    // 定长byte数组,未使用部分会以0进行填充
    byte[] bytes = new byte[maxLength];
    // 生成长度为0~15的数据
    for (int j = 0; j < (int)(Math.random()*(maxLength-1)); j++) {
        bytes[j] = (byte) c;
    }
    buffer.writeBytes(bytes);
    c++;
    // 将数据发送给服务器
    ctx.writeAndFlush(buffer);
}
2
3
4
5
6
7
8
9
10
11
12
13
14
15
16
17
18
# 3.3 方案三:行解码器
行解码器的是通过分隔符对数据进行拆分来解决粘包半包问题的
- 可以通过
LineBasedFrameDecoder(int maxLength)来拆分以换行符(\n)为分隔符的数据 - 也可以通过
DelimiterBasedFrameDecoder(int maxFrameLength, ByteBuf... delimiters)来指定通过什么分隔符来拆分数据(可以传入多个分隔符)
两种解码器都需要传入数据的最大长度,若超出最大长度,会抛出 TooLongFrameException 异常。
这个“最大长度”的存在是合理的,毕竟如果你一直接收不到分隔符,总不能一直接收下去,从而避免发送方消息格式本身不对的问题。
假设以换行符(\n)作为分隔符,客户端代码:
// 约定最大长度为 64
final int maxLength = 64;
// 被发送的数据
char c = 'a';
for (int i = 0; i < 10; i++) {
    ByteBuf buffer = ctx.alloc().buffer(maxLength);
    // 生成长度为0~62的数据
    Random random = new Random();
    StringBuilder sb = new StringBuilder();
    for (int j = 0; j < (int)(random.nextInt(maxLength-2)); j++) {
        sb.append(c);
    }
    // 数据以 \n 结尾
    sb.append("\n");
    buffer.writeBytes(sb.toString().getBytes(StandardCharsets.UTF_8));
    c++;
    // 将数据发送给服务器
    ctx.writeAndFlush(buffer);
}
2
3
4
5
6
7
8
9
10
11
12
13
14
15
16
17
18
19
服务端代码:
// 通过行解码器对粘包数据进行拆分,以 \n 为分隔符
// 需要指定最大长度
ch.pipeline().addLast(new DelimiterBasedFrameDecoder(64));
ch.pipeline().addLast(new LoggingHandler(LogLevel.DEBUG));
2
3
4
# 3.4 方案四:LTC 解码器
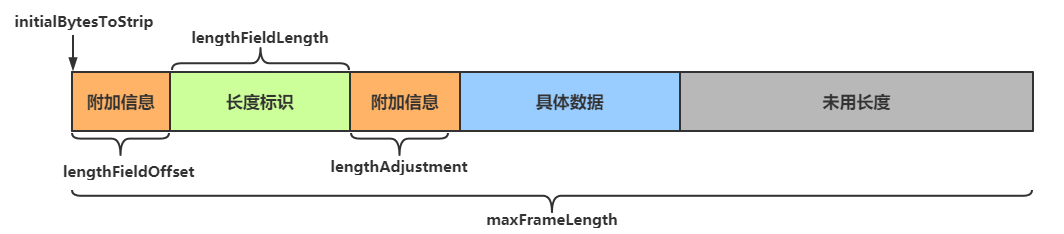
在传送数据时可以在数据中添加一个用于表示有用数据长度的字段,在解码时读取出这个用于表明长度的字段,同时读取其他相关参数,即可知道最终需要的数据是什么样子的。
LengthFieldBasedFrameDecoder 解码器就是基于这个想法,提供了更为丰富的拆分方法,其构造方法有五个参数:
public LengthFieldBasedFrameDecoder(
    int maxFrameLength,
    int lengthFieldOffset, int lengthFieldLength,
    int lengthAdjustment, int initialBytesToStrip)
2
3
4
参数解析:
- maxFrameLength 数据最大长度
- 表示数据的最大长度(包括附加信息、长度标识等内容)
- lengthFieldOffset 数据长度标识的起始偏移量
- 用于指明数据第几个字节开始是用于标识有用字节长度的,因为前面可能还有其他附加信息
- lengthFieldLength 数据长度标识所占字节数(用于指明有用数据的长度)
- 数据中用于表示有用数据长度的标识所占的字节数
- lengthAdjustment 长度表示与有用数据的偏移量
- 用于指明数据长度标识和有用数据之间的距离,因为两者之间还可能有附加信息
- initialBytesToStrip 数据读取起点
- 读取起点,不读取 0 ~ initialBytesToStrip 之间的数据
当每次收到的数据不全时,这个 handler 在继续等待,直接收到完整的数据
参数图解:
lengthFieldOffset   = 0
lengthFieldLength   = 2
lengthAdjustment    = 0
initialBytesToStrip = 0 (= do not strip header)

BEFORE DECODE (14 bytes)         AFTER DECODE (14 bytes)
+--------+----------------+      +--------+----------------+
| Length | Actual Content |----->| Length | Actual Content |
| 0x000C | "HELLO, WORLD" |      | 0x000C | "HELLO, WORLD" |
+--------+----------------+      +--------+----------------+
2
3
4
5
6
7
8
9
10
测试:我们使用 EmbeddedChannel 对 handler 进行测试:
public class EncoderStudy {
    public static void main(String[] args) {
        // 模拟服务器
        // 使用EmbeddedChannel测试handler
        EmbeddedChannel channel = new EmbeddedChannel(
                // 数据最大长度为1KB,长度标识前后各有1个字节的附加信息,长度标识长度为4个字节(int)
                new LengthFieldBasedFrameDecoder(1024, 1, 4, 1, 0),
                new LoggingHandler(LogLevel.DEBUG)
        );

        // 模拟客户端,写入数据
        ByteBuf buffer = ByteBufAllocator.DEFAULT.buffer();
        send(buffer, "Hello");
        channel.writeInbound(buffer);
        send(buffer, "World");
        channel.writeInbound(buffer);
    }

    private static void send(ByteBuf buf, String msg) {
        // 得到数据的长度
        int length = msg.length();
        byte[] bytes = msg.getBytes(StandardCharsets.UTF_8);
        // 将数据信息写入buf
        // 写入长度标识前的其他信息
        buf.writeByte(0xCA);
        // 写入数据长度标识
        buf.writeInt(length);
        // 写入长度标识后的其他信息
        buf.writeByte(0xFE);
        // 写入具体的数据
        buf.writeBytes(bytes);
    }
}
2
3
4
5
6
7
8
9
10
11
12
13
14
15
16
17
18
19
20
21
22
23
24
25
26
27
28
29
30
31
32
33